Let´s create together.  
Edit Content
find a plant

Search by name or category

Lorem ipsum dolor sit amet, consectetur adipiscing elit. Ut elit tellus, luctus nec ullamcorper mattis, pulvinar dapibus leos.

Tumeric

Tumeric

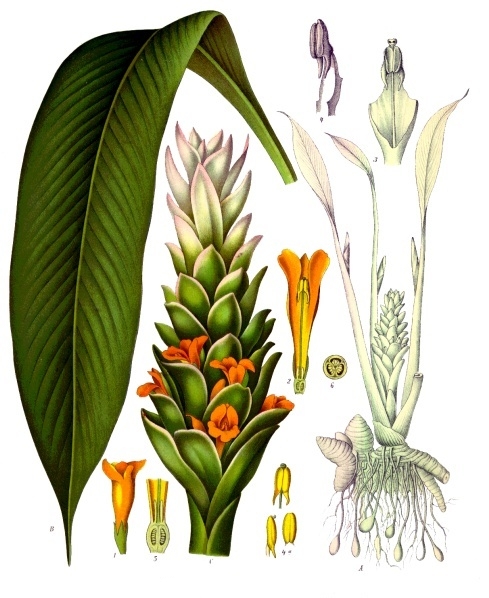
This herbaceous perennial is a member of the Zingiberaceae family (ginger) and is also
considered a spice. The bloom is from July to August and range with burgundy, green, pink, white,
yellow, or bicoloring. This showy part is actually a bract, not the true flower, which means an additional
use as an ornamental. The canna-like leaves make it an attractive foliage plant even when flowers are
absent. The plant grows 3 to 4 feet tall and wide. Tumeric’s rhizomes have been used in food preparation
and in traditional medicine. Other names are common turmeric and turmeric root.

Introduction
Mr. John Doe

Head Director

Description

Optimal Time/Temperature for Germination:
Hardiness zones are 8 to 11. This is not a plant to prune. Your main jobs are to keep it well watered and to shelter the rhizome from cold temperatures. To grow a turmeric plant in a climate colder than zone 8, you have three options: Treat it as an annual. / Grow it in the garden during the summer, then dig the rhizomes up in autumn to store them away for the winter indoors. In this case, you would cut off the top growth, then store them in a cool, dry location. Gardeners typically use peat moss, sawdust, or vermiculite as a storage medium. Keep the storage medium slightly moist throughout winter by occasionally misting it. / Grow it in a pot that can be placed outdoors during the summer then moved indoors in fall, until warm weather returns. Turmeric takes a long time to sprout, but luckily, it can be done indoors during the winter. It also won’t require light until it begins to sprout, so you don’t need to worry about taking up a big space near a window for the 5-6 months required to sprout the stalks. Turmeric rhizomes grow when the temperature is 70–95 °F (21–35 °C). If the temperature drops below 50 °F (10 °C), your plant may die before it has had a chance to sprout. Your turmeric will begin to sprout after 6-10 months of watering in a warm climate. Once you see a stalk start to stick out of the planter or pot, it has started to grow into a mature plant. Leave your turmeric plants where they are until the stalks grow to 4–8 inches (10–20 cm) in length. If you live in a warmer climate and want to plant your turmeric outside, you can plant the rhizomes in your garden. Do it in the winter after the last frost passes so that they sprout in the summer months. You can’t do this if it gets colder than 50 °F (10 °C) outside in winter though.
Optimal Soil Conditions:
In the far North, the plant needs full sun and the further south you are, the more it is advisable to afford it some afternoon shade. Turmeric likes a rich soil. Adding compost and/or manure helps achieve this. Being well-drained and consistently moist is important for its soil too. If you’re planting turmeric outside, do it in a greenhouse with a planter’s box if you can. Turmeric requires a lot of space for the roots and needs a lot of humidity to grow early on. If you’re moving the plants into a planter’s box, dig your hole so that the plant has at least 1.5 feet (0.46 m) of space around it in every direction. Maintain pH between 6.0 to 8.0 – slightly acidic to slightly alkaline.
Seed Planting Depth, Spacing and Procedure:
Since turmeric is a fairly large plant, choose large pots (roughly 18 inches across and at least 12 inches deep). Buy a couple of rhizomes of it in you local grocery store. (more likely available online than at your local garden center). Inspect the rhizomes for buds (think of the “eyes” on a potato). A small rhizome will have two or three buds on it, which is fine. Larger ones may have more, in which case you should divide them. So let’s say that each rhizome that you bought has 6 buds on it. You would break each rhizome in half and plant two halves in one of your pots, the other two halves in another pot. Plant these rhizomes two inches deep in the pot, in early spring. The buds need to be facing up. Keep the pot indoors until nighttime temperatures no longer dip below the 50s (F). At that point, bring the pot outdoors and put it in a sunny spot that is sheltered from high winds.
Best Companion Plants and Plants that Hinder:
You can plant crops that can help provide shade where Tumeric can grow best. It will even act as an insect deterrent due to the allelochemicals that it emits. This can be beneficial to other crops that are especially susceptible to harmful pests. Good companions are Beans, Cilantro, Eggplant, Fruit Trees, Ginger, Lemongrass, Onions, Peas, Peppers, and Tomatoes. What not to grow together with Tumeric is corn. When planted with corn, it has been shown to not yield as much at harvest time when compared to being planted with other crops besides corn.

Growing Instructions

Crop Maintenance

Moisture Requirements & Solutions:
Make sure the soil in the pot never dries out. This can be a challenge because the soil in containers dries out more quickly than soil in the ground. Since turmeric likes humid conditions, increase humidity further by misting the plant’s leaves during periods of hot, dry weather. Turmeric is a plant that tolerates wet soil. At the very least, watch out that its soil never dries out. Turmeric’s water needs are considered to be above-average.
Weeding Needs & Solutions:
Weeds can become a constant menace to all cultivated crops including turmeric. High temperature and humidity pave way for luxuriant growth of weeds. Weeds compete with crop plants for soil moisture, nutrients, light and space. Weed competition in early stage of crop growth virtually affects the yield of rhizome. Weeds cause greater losses of crops than either insect pests and plant diseases. They often suppress the growth of turmeric plants and at the same time encourage the growth of many pathogens and pests.
Feeding Needs/Optimal Natural Fertilizers:
Because turmeric needs a lot of nutrients, feed it every month. Natural liquid fertilizers are best, such as kelp powder mixed with water.
Pests, Diseases & Solutions:
If you find lots of physical damage to your leaves, it could be a sign that you have a thrips infestation or a caterpillar feeding on your plant. Use an organic pesticide like neem oil. When you remove or inspect a rhizome, if it looks gray or pale, it could be a sign of scale damage. Throw your rhizome out to prevent the infestation from spreading and then you need to treat the soil. Turmeric plants are often unappealing to many insects in temperate regions of the world. Turmeric powder can even be used as a pesticide with some crops.
When to Harvest/Number of days to maturity:
At some point in the next 2-3 months, the turmeric plant will begin to brown and dry out. This is the best time to harvest your turmeric. If you continue to let the plant grow, it will slowly rot over time and ruin any potential turmeric that you could extract. You can tell if your turmeric is almost ready for harvesting if it seems like it’s struggling to retain water and dries out quickly. Harvest it in fall after the first frost, which will produce yellowing in the leaves. It is the rhizome that you are harvesting because that is the plant part most often used in food preparation and medicinally.
How to Harvest:
Cut the stems of your plant 1–3 inches (2.5–7.6 cm) from the soil. To harvest the turmeric, you need to access the adult rhizomes underneath the soil. To start, use garden shears or a cutting knife to remove the stalks near the soil. Discard the leaves by composting them. If the plant is dry enough, you should be able to simply snap the stalk near the bottom. If you are growing turmeric as a spice or as a medicine, you will want to remove at least a portion of the rhizome each year at the end of the growing season. The rest can be brought indoors as you would when growing turmeric as an ornamental. This way, you have an annual source of turmeric for use in cooking.
Optimal Storage temperature and conditions:
Once you’ve cut the stem, pull the remainder of the plant out of the soil by hand. Cut or snap off the remaining sections of stalk and take the mature rhizome to a sink to wash it. Run it under warm water and rub it softly by hand to remove the dirt and soil off of the rhizome. Don’t forcibly scrub the rhizome. You just need to remove the outer layers of dirt and soil before grinding, using, or storing it. Place any rhizomes that you don’t plan on using in an airtight plastic bag or storage container in the fridge for up to 6 months without inflicting any damage on the flavor of the turmeric. To prepare a rhizome for grinding, boil a clean rhizome in a pot with water. Once the water reaches a rolling boil, turn it down to a simmer. After 45-60 minutes, drain the pot in a colander or strainer. You can rub the skin off of the rhizome after boiling it, although it’s perfectly fine to leave it on. You can tell if the rhizome is ready for grinding if a fork easily pierces it after boiling. Grind your rhizome to make turmeric powder. Let your rhizome dry out in the sun for the day. Cut your rhizome into smaller pieces and then grind it with a spice mill, grinder, or with a mortar and pestle until you’ve got a fine powder. You can use a food dehydrator set to 140 °F (60 °C) to dry your rhizome more quickly if you’d like. It’s ready to cut and grind once it’s brittle and dry. This process usually takes 30-45 minutes. Store turmeric powder in an airtight container designed for food storage. Consider wearing a pair of gloves when you peel or cut the turmeric. It’s also a good idea to wipe down your cutting board as soon as you’ve finished preparing the raw turmeric. If you don’t want the raw turmeric to accidentally stain your clothes, put on an apron. Sprinkle ground turmeric on top of cooked foods as an added spice. You can sprinkle it on casseroles, roasted vegetables, eggs, steamed vegetables, and soups. You can also blend it into a smoothie. To make turmeric tea, add 1 teaspoon of ground turmeric and a pinch of black pepper to a cup of water and boil for 3 minutes.
Optimal Preserving Procedures:
Seed Saving:
To grow it, you’ll need to plant a turmeric rhizome, which is an immature length of turmeric root. Growing turmeric is easy as long as you can consistently monitor and water your rhizome. This shouldn’t be too tall of an order since most of the growing process can take place indoors and doesn’t require sunlight so later transfer them outside.

Harvest and Storage

Notes

Tumeric leaves are also edible. They are added to curries and used as wrappers for steamed dishes. You can replant rhizomes after they’ve been stored in your fridge. As long as the rhizome hasn’t been boiled or cooked, you can replant with the above process. Do not grind any rhizomes that have been treated with a nonorganic pesticide. Instead, wash and replant them for another cycle before using them. If your turmeric plants start to smell when they’re being stored indoors, it may be a sign that the rhizomes are rotting. Turmeric takes a long time to grow and requires a lot of water to stay healthy. If you know that you’re going to be gone for a long period of time at some point in the next year, you may want to hold off on growing turmeric. Tumeric makes an excellent natural dye for fabric, producing rich yellows and oranges. Caution: If you’re pregnant or nursing, ask your doctor before adding raw turmeric to your diet.

From the same Category

0 0 votes
Article Rating
Subscribe
Notify of
guest
0 Comments
Oldest
Newest Most Voted
Inline Feedbacks
View all comments

Contact to Listing Owner

Captcha Code
0
Would love your thoughts, please comment.x
()
x