Let´s create together.  
Edit Content
find a plant

Search by name or category

Lorem ipsum dolor sit amet, consectetur adipiscing elit. Ut elit tellus, luctus nec ullamcorper mattis, pulvinar dapibus leos.

Maple Tree, Sugar Maple Tree

Maple Tree, Sugar Maple Tree

There are many types of maple trees, but only one sugar maple (Aceraceae Maple family). All maple trees produce sap which contains sugar, and most can be used to make syrup, but the sugar maple is considered the best for syrup production.


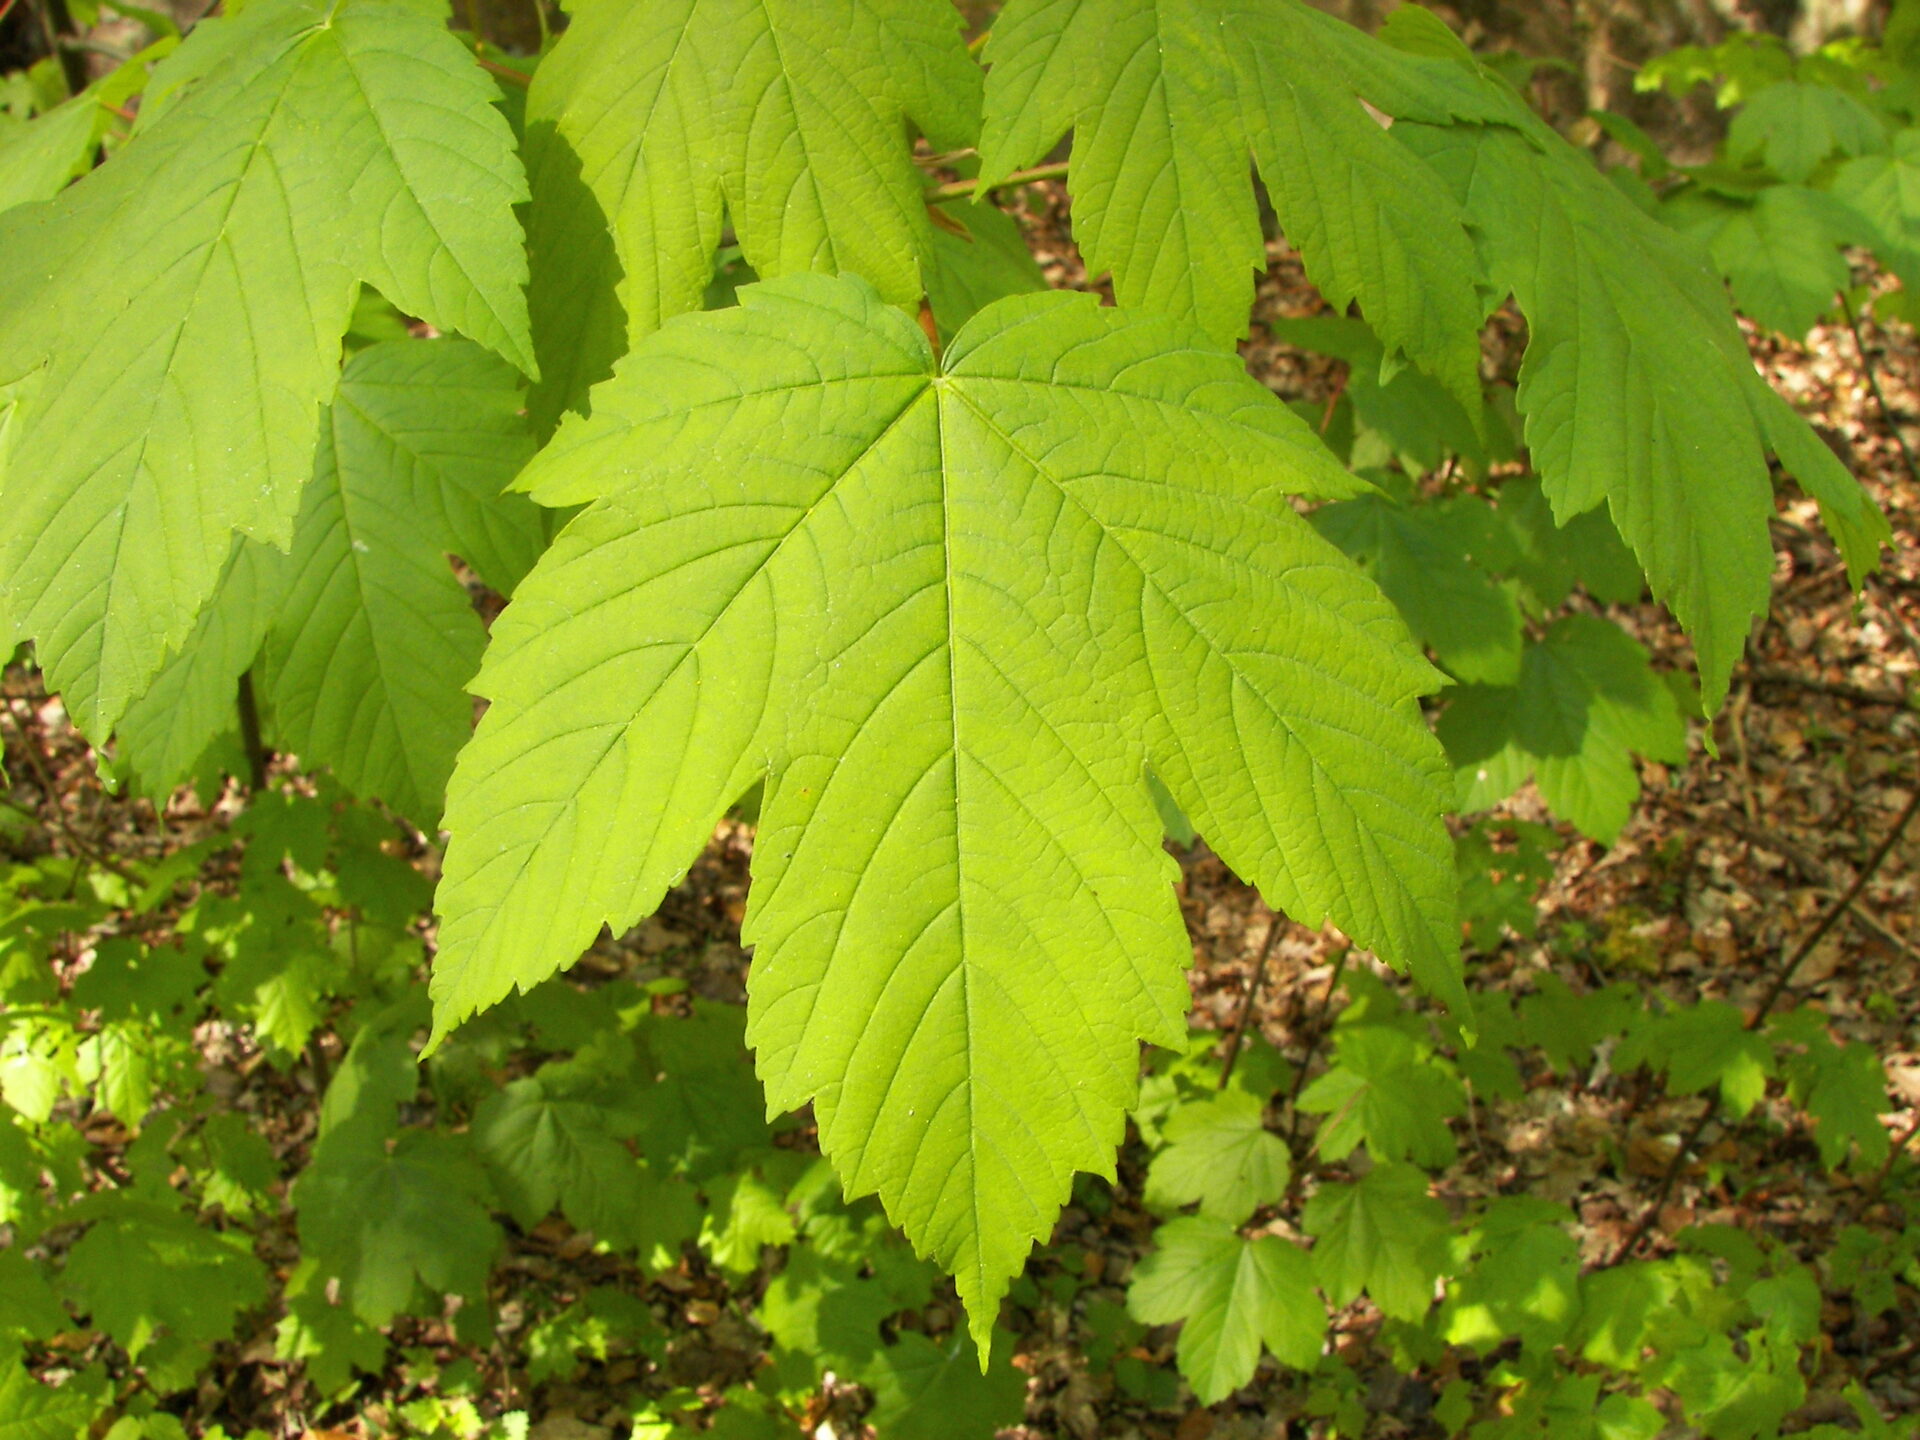
Sugar maple leaves will have a dark green color on the outside, and a lighter green on the underside.
In the fall, sugar maple leaves will lose their green color and take on a beautiful orange, yellow, or red.
Sugar maple leaves are segmented into 5 lobes. There should be three large, main lobes and one
smaller lobe on either side. The lobes are characterized by sharp teeth, and are connected by shallow,
U-shaped notches. Some underdeveloped or stunted sugar maple leaves will have only three or four
lobes. If you see a leaf with fewer than five lobes but suspect the tree is a sugar maple, look around
and find other leaves, which may be better specimens. The leaves of the Silver maple can be
distinguished from those of the Sugar maple. Silver maple leaves have very deep margins between the
five lobes, and the underside is silver or white in color.


Look closely at the edges of the leaf. Sugar maple leaves have smooth, U-shaped margins between
points. The leaves should also be round at the base. The sugar maple is the national tree of Canada
so if you want an indicator of whether or not you are looking at one, compare the shape of your tree’s
leaves to the leaf on the Canadian flag. While many other maples also have smooth margins, the
extremely common red maple has sharp points and serrated or toothed margins between the lobes.
This can be a useful distinguishing feature. The sugar maple leaf stalk (also called a “petiole”), which
connects the individual leaves to the branch they grow on, should be the same length as (or slightly
shorter than) the blades of the leaves. Look for leaves that grow perpendicular, or at a right angle, from
the twig, in pairs. This is called an opposite orientation. Leaves will grow in “sets” of two, with one leaf
always across from another on every twig and branch. Only one leaf should grow from each individual
stem. There will be one vein running through each main lobe, but the two smaller lobes on either side
of the leaf will not have a vein running through them. These veins are detectable on the underside of
the leaf, but lie smooth on top. On the underside of the leaves, the veins may appear slightly “hairy.”
Mature leaves on a sugar maple average between 3 inches (7.72 cm) and 5 inches (12.7 cm) long,
and are equally as wide. If you won’t have a ruler with you in the woods, but are planning to examine
tree leaves, measure a segment of one of your fingers. This can serve as an approximate ruler in the
field. For example, from the tip of your thumb to the first joint may measure one inch.


Identify Sugar Maple by its bark. The bark changes color as it ages. The bark of younger trees will be
grayish-brown in color. As the sugar maple trees mature, the bark will deepen to a dark brown. It is
characterized by vertical grooves that are closely spaced.

The bark can be described as furrowed, and has deep rifts or valleys between each plate of bark.
Sugar maple trees are often confused with Norway maples in Europe and western Asia.


The two are most easily distinguished by their bark: the bark of a young Norway maple is one thin
layer. Over time, Norway maple bark will develop vertical fissures, but they are not as deep and
pronounced as the fissures of the Sugar maple, and do not lift up as much around the edges of the
bark plates. The edges of the plates of bark gradually lift as a sugar maple gets older, and the plates
flake away from top to bottom once the tree has reached maturity. Mature sugar maple trees may
appear “shaggy” from a distance, due to the exaggerated peeling plates of bark that the trees develop.
Inspect the tips of the twigs. They are the small, thin branches that grow out of larger branches, and off
of which the individual leaves grow. Look for twigs that are narrow, sleek, and a reddish-brown color.
The small buds at the ends of each twig should be covered with tiny brown-colored scales. During the
winter months, you may find brown, cone-shaped buds growing along the length of the twigs, in an
opposite orientation, and 1 larger bud growing straight out from the terminal end of the twigs. Twig
buds are also useful in distinguishing Sugar maples from Norway maples. The buds of the Norway
maple are larger than those of the Sugar maple. Norway maple buds are covered in larger purple
scales, which form a rounded tip.


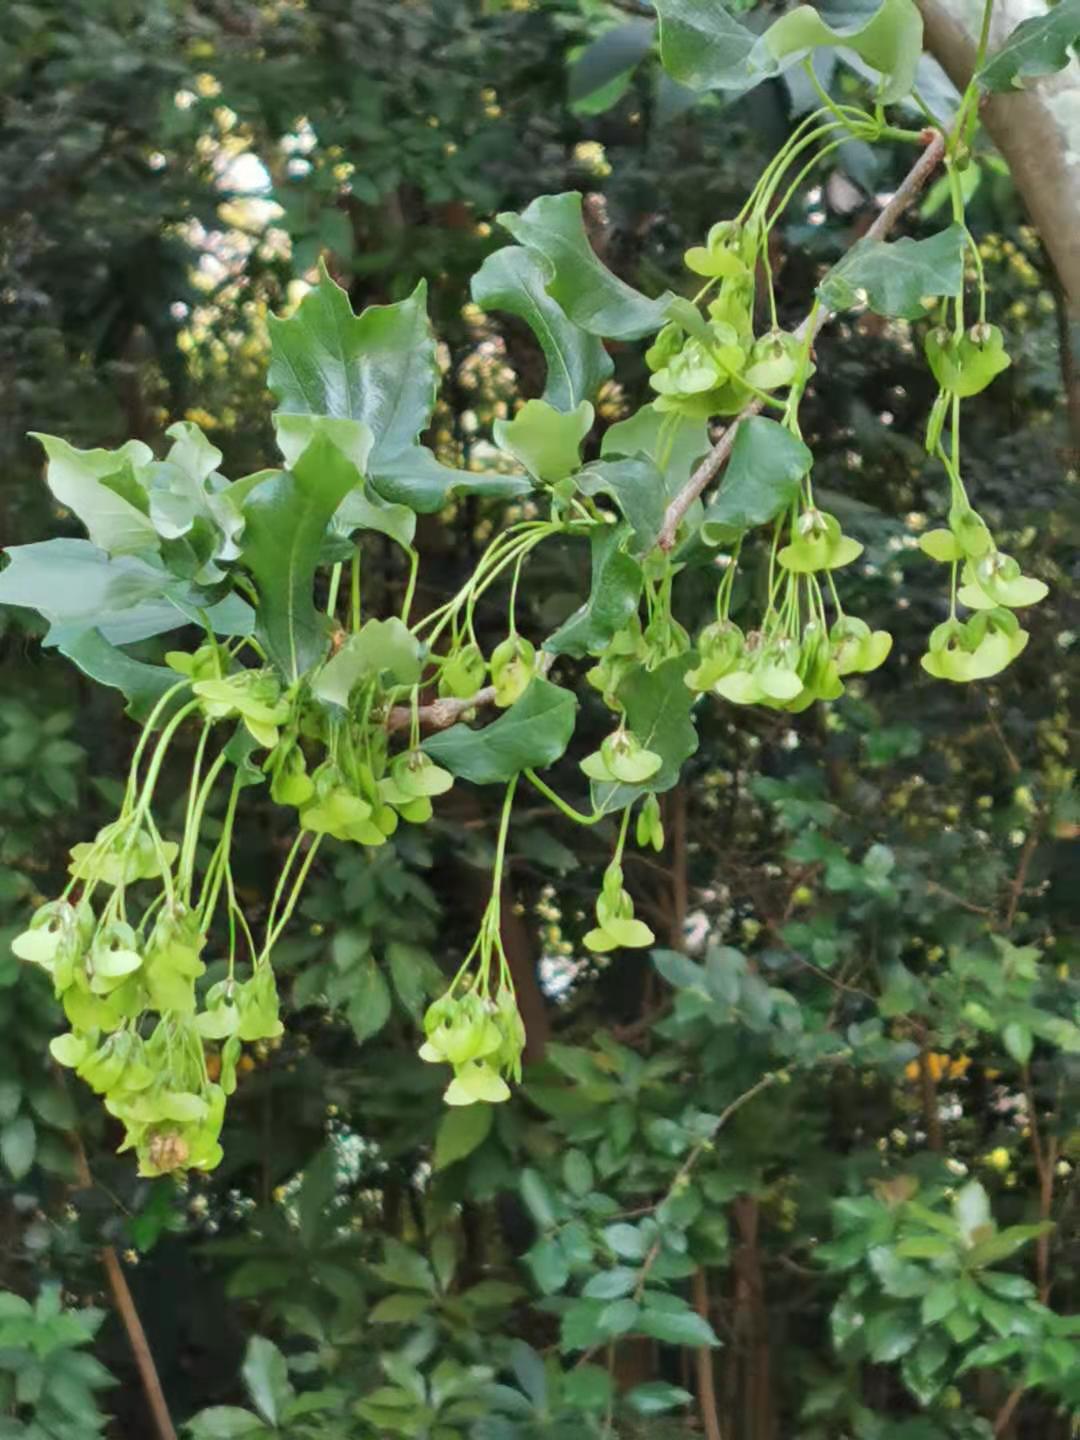
Look for fruit that are green, turning brown when mature in the fall. The leaves are “horseshoe”
shaped, meaning that each fruit has two leaves that grow from opposite sides of the fruit. The flowers
form double-leafed, wing-shaped fruits. The paired “wings”connect at the fruit and are oriented to each
other at a 60 to 90 degree angle. (helicopter effect when flying in the air.) The fruit should measure
about 1 inch (2.54 cm) long, including both “wings.” The wings of a sugar maple grow parallel to one
another. The fruit are technically referred to as “samara,” and may also be referred to as a key. These
fruits are sometimes referred to as “seeds.” However, fruit is the correct designation, as the seeds are
located inside the fleshy tissue of the sugar-maple fruit. Each sugar maple fruit,located between the
two horseshoe-shaped leaves, will have a paired structure. Two distinct fruits, each the size of a small
pea, will look as though they have been fused together in the center of each fruit.

Introduction
Mr. John Doe

Head Director

Description

Optimal Time/Temperature for Germination:
Maple species can vary from shrub-size Japanese maples to sugar maples that reach 75 ft (23 m) in height and 50 ft (15 m) in canopy spread, so choose a species that suits your available space. Most maple species are best suited to USDA Zones 3-8. A few specific examples like Japanese maples prefer Zones 5-8, silver maples prefer Zones 3-9, and crimson king maples prefer Zones 3-7. One of the most widespread American maple species, the red maple, averages 50 ft (15 m) in height and 30 ft (9.1 m) in canopy spread at maturity.
Optimal Soil Conditions:
Maple trees prefer soil that stays moist most of the time yet also drains quickly. Test the soil drainage by digging a 1 ft (30 cm) deep hole, filling it with water, and letting the water drain completely. Refill the hole with water and time how long it takes for the water to drain completely again. If it takes between 5 and 15 minutes to drain, the soil is ideal for maples. If it takes longer than 15 minutes to drain, the soil isn’t ideal for a maple. Anything longer than 60 minutes is definitely not good for a maple. Soil that drains in less than 5 minutes is okay for a maple, but the tree may require more frequent watering as it gets established. In many climates, late spring and early fall are the best times to plant maple trees. Aim for a time when the air temperature is comfortably cool—not freezing cold nor uncomfortably hot. Likewise, the soil should be cool but not frozen (or nearly frozen). These conditions promote root growth. In some climates, fall is definitely the best time to plant a maple, while spring is the ideal time in other climates. Your best bet is to consult a pro at a local plant nursery or agricultural extension office. Test the soil according to the kit’s instructions to determine if soil pH is between 5.0 and 7.0 by digging a 2–4 in (5.1–10.2 cm) deep hole in the soil, clear away any rocks or twigs, and fill the hole with distilled water. Dip the test probe into the muddy water and wait about 1 minute. Check the pH readout or use the color-coded guide provided with the kit. If the soil pH is outside the 5.0 to 7.0 range, you’ll have better luck planting another species of tree. Soil pH can be adjusted with amendments, but it is very difficult to maintain a consistently altered pH for the life of a tree—especially since maples can live for 100-300years.
Seed Planting Depth, Spacing and Procedure:
Planting a maple near your home can provide wonderful shading. However, the leaf canopy of any type of tree you plant, when fully grown, should not touch or overhang your home. So, if your chosen silver maple has an average mature canopy of 50 ft (15 m), then 25 ft (7.6 m) from the trunk all the way around—plant it at least 30 ft (9.1 m) from your home. Overhanging limbs can clog gutters with leaves and cause damage in storms. Also, the root system of a tree extends underground at least as far as the canopy, and roots can cause damage to your home’s foundation. Make sure there are no overhead or underground utility lines in the area of both the mature leaf canopy and root system. Most varieties should be about 25 feet apart from other trees but it will vary depending on the size of the fully grown tree. Maples do best in a place that gets both sun and shade during the day. If you choose a spot that averages less than 4 hours of direct sunlight per day, your maple will likely survive but not achieve its full potential. If a maple tree is exposed to intense, direct sunshine for too long, its leaves may shrivel and fall off. Some maple varieties do have slightly different sunlight needs. For example, Norway maples can handle some partial shade, coral bark maples can deal with some light shading, and paperbark maples need full sunlight. If your tree comes with a root ball that’s 2 ft (61 cm) wide and 2 ft (61 cm) deep, for example, dig a hole that’s 6 ft (1.8 m) wide and 2 ft (61 cm) deep. Use the same formula if you’re planting a bare-root tree without a root ball. This hole depth may end up being a bit too deep when it comes time to position the tree, but it’s easier to dig the hole a bit deeper now and backfill it as needed. If the soil is heavy clay, scrape channels into the side walls and bottom of the hole with a hand rake or the tip of a dirt shovel. Doing so will make it easier for water and tree roots to penetrate the clay. If the maple is in a tree nursery container, grasp the trunk and lift it straight up and out—if it’s stuck, cut away the container. Put on gardening gloves and use your fingers to loosen the root tips around the exterior of the root ball. If the root ball is very tightly packed—or “root bound”—use a garden hose to blast away some of the packed- together soil around the exterior. If the root ball is instead wrapped in burlap, simply cut away the burlap with garden shears and then loosen the root tips. A bare-root tree requires minimal if any root preparation. Simply loosen up any root tips that are packed together. Lift the tree by its trunk and place it in the middle of the hole, standing straight up. In ideal soil conditions, the top of the root ball should be either level with or just a few inches/centimeters above the surrounding ground level. If this is the case, move on. If the soil drainage is less-than-ideal, aim to have up to one-third of the root ball above ground level. In this case, lift out the tree, shovel in some of the dirt you removed, replace the tree, and keep fine-tuning as needed. If the backfill soil that you dug out to create the planting hole is sandy or very dry, replace 25%-50% of it with an even mixture of bagged topsoil and either peat moss or compost. If the backfill soil is densely-packed dirt or clay, replace 25%-50% of it with bagged topsoil and/or a bagged planting mix. Simply remove some of the existing backfill, dump on the additions, and use your shovel to mix the new backfill together. Remove any rocks from the backfill while you’re at it. Improving the soil this way will help the tree flourish early on and ease its transition into the native soil. Use your shovel and the backfill soil mixture to fill the hole halfway, then pour 1–2 US gal (3.8–7.6 L) of water evenly over the soil to remove any air pockets. After the water soaks in, fill the rest of the hole up to the surrounding ground level, then pour on another 1–2 US gal (3.8–7.6 L) of water. If you have a helper, have them hold the tree trunk to keep it completely upright. If you’re working solo, try to hold the trunk with one hand while backfilling with the other. If the top of the root system is above ground level, mound up just enough soil to cover the exposed roots with a couple of inches/centimeters of dirt. Tamp down the backfill with a tamper tool or shovel to remove air pockets. You may need to add a bit more backfill to bring the soil back up to ground level—if so, tamp it down and repeat the process as needed. If the top of the root ball is above ground level, tamp the small amount of soil that’s covering it very lightly. Spread a 2 in (5.1cm) mulch layer over to cover the entire backfill area or extend 3 ft (91 cm) from the tree trunk all around—whichever is larger. Don’t pile up mulch right against the trunk but leave a 2–3 in (5.1–7.6 cm) gap between the trunk and the mulch. Staking is optional for maples. To stake a newly-planted maple, pound in 2-3 wooden stakes that are equally spaced apart around the tree trunk—put them about 2 ft (61 cm) from the trunk and angle them roughly 45 degrees away from the trunk. Tie a nylon string to each stake. Wrap a rubber covering around the tree trunk where you intend to tie the strings, then attach them securely but not too tightly around the trunk. Remove the stakes after the first year of growth after planting. Otherwise, they may restrict trunk growth.
Best Companion Plants and Plants that Hinder:
A best companion plant is White Pine, known to provide a natural defense against insects attracted to maples. Sugar Maple is found with a variety of native trees in our natural forests including American Basswood, Yellow Birch, American Beech, Northern Red Oak, and Eastern Hemlock.

Growing Instructions

Crop Maintenance

Pruning is particularly helpful during the first several years of growth, but don’t overdo it! Use sharp pruning shears to nip off dead, damaged, intertwined, or low-hanging branches no more than 1 in (2.5 cm) from the trunk or limb—get as close as you can without damaging the bark on the trunk or limb. During the spring, prune any branches that are sprouting near the soil line. In summer, prune dead, damaged, or twisted branches, as well as branches you want to remove for aesthetic purposes. In winter, do another round of pruning similar to that done in the summer.
Moisture Requirements & Solutions:
A few days after planting the tree, dig a small hole toa depth of 6 in (15 cm) near the edge of the mulch bed. If the soil is dry, add water to the entire mulch bed until the soil is damp but not soaked at the bottom of the hole. Repeat this process every few days until you get a good handle on how much water you need to add— and how often you need to add it—to keep the soil moist. Water the tree as needed for at least the first year after planting it. You might, for instance,have to add 3–4 US gal (11–15 L) of water twice per week. If the tree branches and leaves start to wilt on your maple tree, it is not getting enough water
Weeding Needs & Solutions:
The 2 inch spread of mulch is sufficient to hold in moisture and limit weed growth—adding more isn’t necessary.
Feeding Needs/Optimal Natural Fertilizers:
Fertilizer may give the tree a boost, but digging mulch or a light layer of moss peat into the surface around the trunk each growing season is more beneficial as it adds a small amount of organic matter and helps to hold moisture in the soil.
Pests, Diseases & Solutions:
Don’t pile up mulch against the trunk, the wet mulch may cause rot on the tree bark and potentially kill your newly-planted maple. To ensure your tree’s survival, immediately deal with damage from various diseases, insects like caterpillars and aphids, and wildlife like deer and rodents. Maples are typically fairly resilient against insect damage, but they are susceptible to bark damage from wildlife such as deer. Consider loosely wrapping plastic or metal fencing around the trunk if you see missing bark or other signs of damage. Diseases may cause spotting on the leaves, bark damage, or other issues.
When to Harvest/Number of days to maturity:
Start tapping when the temperatures at night are below freezing (32 degrees F), and the daytime temperatures are above freezing. A larger swing in temperature differences (say, 20 degrees at night, to 40+ during the daytime) will often be beneficial, as it causes a sort of “pumping” action as the sap travels up and down in the tree.The best time to start varies, as the temperature swings vary from year to year. Be ready when your forecast indicates the above mentioned differences. Some dates have been as early as late January to mid February, through as late as mid April; just have your taps, tubing, collection containers, and cooking equipment ready to go.
How to Harvest:
The most important step in the process of tapping a tree for maple is finding just the right tree. Look for a maple tree that is at least 12 inches in diameter and has a lot of direct sunlight. Maple trees that give the most sap are of the sugar or black variety. (Red and silver maple trees will also provide sap, but not as much as the other two species.) One overlooked tree for sugary sap is the Black Walnut. Avoid unhealthy trees that have been damaged in the past. They will not provide as much sap as a big, strong, healthy tree. You can tap a single tree multiple times if it is large and healthy enough. For a tree 12-20 inches in diameter, a single tap is all that can be used. For a tree 21-27 inches wide, you can use up to two taps. A tree can have three taps if it is wider than 28 inches across. Trees with a larger crown – all the branches and leaves – typically give more sap than trees with a smaller crown. The fluctuating temperatures cause the sap to flow, moving it from the tree trunk and branches to the roots below the ground. Sap flows for around 4-6 weeks,but this depends on the health of the tree and the environment. Generally, the best sap is gathered at the beginning of the flow. To tap a maple tree, you will need a bucket with a cover (to keep things from falling in),a spile, and a drill. It may also be helpful to have a large clean trash can or similar vat to use as storage for all the sap you will tap. Thoroughly clean the spile, bucket, and cover with bleach and water. Make sure that they are completely dry before use. For your drill, you will need either a 7/16 or 5/16 drill bit. Tap the side of the tree that gets the most sun throughout the day, ideally the south side. If you can, it is best to tap above a large root or below a large branch. If the tree you are tapping has been tapped in the past, make sure that your new spile is inserted at least 6inches away from the old hole. Place the tap in a healthy section of wood. If you drill and the shavings are light brown or tan, the wood is healthy. If you drill and the shavings are dark brown or chocolate-y colored, find a new place to tap. Drill on a sunny day when it is a bit warmer out to minimize the chance of splitting the wood. Hold the drill as an angle going slightly upwards to make sap flow easier. Drill in about 2.5 inches. To know how far to drill, you can tape around your drill bit 2.5 inches from the end prior to drilling. Use a sharp drill bit to avoid creating a rough hole, which can decrease the amount of sap that is released. Remove all wood shavings from the hole once you’ve finished drilling. Put the spile in the tree. Tap it in using a rubber mallet or hammer to ensure it is sturdy enough that it cannot be pulled out easily by hand. Don’t hit the spile into the tree too hard, or else you run the risk of splitting the wood. If you do not want to buy a spile, you can make your own using ⅜” aluminum piping. Avoid using copper, as it is toxic to the tree. Widen one end so that it can be used as a spout to pour the sap into your bucket. Hang your bucket. Attach it to the end of the spile, or if you made your own use a bit of wire to hook it to your spout. Make sure that the bucket is secure, so that it cannot accidentally be knocked off or blown off by the wind. Put the cover over the top of the bucket to prevent debris from entering your sap store. Wait for your sap. Collect it daily in the afternoons when it is the warmest outside. If the weather is good, you will be able to collect sap for just over one month. A healthy tree can provide between 10–80 gallons (37.9–302.8 L) of sap, depending on environmental conditions. Sap will stop flowing if the daytime temperature does not rise above freezing, or if the nighttime temperature stays above freezing and becomes too warm. Collect all your sap into a large container, such as an empty (clean) trash can. Otherwise, you will have many full buckets taking up space. You should take the spile out of the hole, The tree seals the hole itself over time. There will always be a little “scar” however. But there is no reason to plug the hole. You can try tapping it again next year.
Optimal Storage temperature and conditions:
If the temperature rises above 45 °F (7 °C),the sap must be refrigerated. Otherwise, it will spoil and begin to grow bacteria. To make your maple syrup You will need to use a large pan and an outdoor gas range or wood stove. You will also need a cloth syrup filter and storage containers. Avoid boiling your sap indoors, as it creates a large amount of steam. You can use a dehumidifier to reduce the amount of steam that is produced, allowing you to boil the sap indoors. A candy or syrup thermometer is very helpful in getting the sap to the perfect temperature. Using a wood stove creates the best maple syrup, as it imbues the sap with a rich smoky flavor. Never leave boiling syrup unattended. When boiling your syrup, keep a keen eye to make sure that it does not boil over or burn. Boil and keep the sap at least 11.5 inches deep to keep it from burning. Be prepared, as sap boils down very quickly and gives off a lot of steam. As the sap boils down, add more to keep it at the 11.5 inch level. You can add cold sap to the boiling sap, or pre-warm it. Boil the sap until it reaches 219 °F (104 °C). This will give you pure maple syrup. If you want to make maple sugar, continue boiling until it has reached 234 °F (112 °C). Use a cloth maple syrup filter, available for purchase online, to separate out any “sugar sand” that formed during the boiling process. Always filter the syrup while it is hot, between 180–200 °F (82–93 °C). Heat the syrup filter in hot water for a few minutes before use. This will help the syrup to filter better, and also kill any bacteria that might have been attached to the filter. Store syrup that is waiting to be filtered in a closed container to help it to maintain its heat. If the syrup cools too much, reheat it to be within the 180-200 degree range. Be careful of overheating it though, as you could burn the syrup. If the syrup is pouring through the filter too quickly, the filter may be bad and need to be replaced. It should “ooze” more than it should pour. Store your syrup in a covered container. To extend the life of your syrup, you can keep it refrigerated once you open its container. Keep in mind that the sap will yield 1/40 of it’s amount in maple syrup.
Optimal Preserving Procedures:
Seed Saving:
If the seeds fall in fertile soil and receive enough water, they will grow into more sugar maples.

Harvest and Storage

Notes

If you tap a tree with a diameter of less than 25 cm or younger than 30 years, there is a possibility of stunting it’s growth and even killing it by accident. Maples can be hardy trees and survive even cold winters, but they generally don’t like hot sun in the summer. Although not required, it’s sometimes recommended using a root starter to give your new tree an extra head start in its new home. The thicker the syrup, the higher concentrate of sugar. The thinner the syrup, the less concentrated amount. If it is natural maple syrup, it isn’t bad for you. However, if it is artificial, then it will cause you to gain weight and can cause cavities, as it’s little more than flavored sugar syrup. Always prefer the authentic syrup. If the tree is 40 cm in diameter and you want more syrup, you can tap the tree on opposite sides. However, be sure that the taps face east and west, as taps exposed north will produce far less sap. Maples are also sought for its hardwood for traditional furniture while some like it for firewood.

From the same Category

0 0 votes
Article Rating
Subscribe
Notify of
guest
0 Comments
Oldest
Newest Most Voted
Inline Feedbacks
View all comments

Contact to Listing Owner

Captcha Code
0
Would love your thoughts, please comment.x
()
x