Let´s create together.  
Edit Content
find a plant

Search by name or category

Lorem ipsum dolor sit amet, consectetur adipiscing elit. Ut elit tellus, luctus nec ullamcorper mattis, pulvinar dapibus leos.

Pinyon Pine Tree

Pinyon Pine Tree

Pinyon is known as a white pine, which means that the wood from it is whiter in color instead of reddish tan colored. Needles on most white pines normally grow in clusters of 5 so the Pinyon is unusual in that its needles grow only in pairs. Foresters classify pines in two groups. Although you can harvest many different pinyon pine trees, some provide better harvests than others. The best for harvesting are the Colorado pinyon, Mexican pinyon, and single-leaf pinyon because they produce large pine nuts. Pinyons are the only pine trees that produce nuts large enough to harvest. The pine tree is an evergreen.

It’s important to know which type of pine nut species you’re dealing with. Pine nuts can have soft or hard shells, and hard-shelled nuts shouldn’t be cracked with your teeth, or you could hurt yourself. Here are the main types of pine nut you need to know:

The New Mexico pinon pine nut
This is a buttery nut that is wild and hand harvested. These are the most valuable pine nut in the world and they have a hard shell that is too hard to crack with your fingers or teeth.

The Italian Stone pine
This nut is popular in Europe and throughout the Mediterranean. It is a longer, rounder nut.

The Chilgoza pine nut
These nuts are typically found in Afghanistan or Pakistan and they are long and boat-shaped with a sharp end. They are typically shelled by roasting over an open fire; they are more rare.

The gray pine nut
Typically found in Northern California, these nuts have a bit of a softer shell.

The Nevada pine nut
These are sweeter, fruitier, larger, and easier to shell.

Introduction
Mr. John Doe

Head Director

Description

Decide between using bare-root seedlings or seedlings grown in a container. Bare-root pine seedlings must be planted during the late fall and winter, when pine trees are dormant. Container-grown seedlings can be planted at any time, although the hottest summer months will require additional shade and water to prevent dehydration and sun damage. Most seedlings can be kept for several weeks between 35º and 38ºF (1.7 – 3.3ºC), but you should check with the seller in case the species you bought has different requirements.
Optimal Time/Temperature for Germination:
Do not plant trees when conditions are windy, dry, or above 85ºF (30ºC). The soil should not have standing water or ice on the day you plant, but should not be parched either. Hardiness zones 4 to 8. Fresh pine seeds acquired in fall can usually be planted immediately. However, even fresh seeds may benefit from a special environment which increases the speed of germination (sprouting) and reduces the chance of your seeds staying dormant after planting. Storing seeds in this way to mimic ideal seasonal conditions is called stratification. Different species of pine tree do best in different conditions. Identify your species in a regional tree identification book or website if possible, and look up how long “stratification” takes. If you can’t, the below methods should work as long as you check the seeds’ progress regularly. In general, pines that grow in relatively warm climates further south (but not at high elevations) require little to no stratification before planting and can simply be stored dry at room temperature, while pines from damper, colder climates cannot grow without a cold, moist period. If you have a handful or two of seeds or fewer, this method may be easiest. Stack paper towels until the stack is 1/8 to 1/4 inch thick (3 to 6 mm). Add just enough water to moisten every part of the towels, then hold vertical by one corner until the excess water drains off. Place the seeds on one half of the paper towels in one layer, then fold the other half over the seeds. Seal in a plastic bag and store in the refrigerator at about 41ºF (5ºC). You may wish to include a thick straw or other thin tube to allow a small amount of air exchange with the outside, to ensure the environment has sufficient oxygen. Immediately after completing the soaking step, put half a pound (0.23 kg) of seeds or less onto a square of cheesecloth or other soft mesh material and tie it into a bag. Hang or hold up the bag and let the excess water drain for about a minute. Tie the neck of a larger, plastic bag to the neck of the cheesecloth so the water can continue to drain without soaking the seeds. Hang this in your refrigerator at about 41ºF (5ºC). Note: If you can identify your species, search for information on “stratification” for that species online. You may wish to store the bag in a warm location before transferring to the fridge. A seed beginning to germinate will crack open and start to extend a growing root. Depending on the species and the individual seed, this could take anywhere from 3 weeks to multiple years, although you never need to store a seed for that long before planting. For seeds that refuse to sprout after several weeks, you can encourage them by letting them dry out, then repeating the treatment. If the growing season is over or you wish to save seeds for next year, dry the surface but leave them slightly damp, then store in the refrigerator. Keep checking regularly to be sure they don’t sprout. Pine seeds are vulnerable to infection and rodents when planted in outdoor soil. Try to find plastic tubes intended for growing pine trees, as these are best for encouraging long root structures that will support the tree. Otherwise, an ordinary small plant pot will work. Instead of using soil, use a potting mix intended for pine trees, or create your own mix of 80% pine bark and 20% peat moss. Push the seeds just under the soil with the pointed root facing downward. If keeping the plants indoors, keep the pots on a raised table to make it more difficult for mice to reach them.
Optimal Soil Conditions:
Choose a location where the tree will receive direct sunlight during the cooler parts of the day. If you cannot plant a pine tree somewhere with shade on its west side, instructions are included below for creating a sun shade. A mix of sand and loam is best for pine trees, but you should only need to mix in suitable organic mulch such as sphagnum if the soil is a hard clay consistency. Choose an area with well-draining soil. A 1 foot (30 cm) deep hole filled with water should drain easily within 12 hours. If it does not, you may need to install drainage.
Seed Planting Depth, Spacing and Procedure:
The top layer of soil is the highest quality, so fill the bottom few inches (about 10 cm) with topsoil after you dig your hole. Be sure to dig the hole large enough that the roots still fit after you’ve added the topsoil. Warning: Contact your utility company to discover the location of underground lines before digging any large holes. Try to plant the tree to the same level it was planted in the nursery. If you’re unsure, it is better to plant the tree too high than too low. If you’re planting more than one pine tree, be sure to leave at least 10 to 12 feet (3 to 3.7 m) of spacing so they can grow to mature width without any obstruction. Some varieties of pine may need even more space, like the huge Austrian pine. Although burlap and other biodegradable material can be left on the plant, carefully removing it gives the seedling a better opportunity for growth. Fill the hole again after planting, periodically patting down loose soil with your shovel handle, not with your feet. Fill the hole until it is level with the surrounding soil, or slightly lower if the climate is especially dry, so water can run into the roots. Staking pine tree seedlings is only necessary in areas of unusually high wind. If you think the pine tree is in danger of blowing over, use one or two stakes attached by ties or straps, and leave enough room for the tree to sway. Do not loop wire directly over the tree. You may need to provide a sunscreen for your small pine tree by using a tarp or sheet of painted plywood. Planting where there is shade from another tree or a building is also a practical choice. The shade should be on the west side of the tree, which is where the sun is located during the hottest parts of the day.
Best Companion Plants and Plants that Hinder:
Rocky mountain juniper, blueberries, blackberries, and huckleberries.

Growing Instructions

Crop Maintenance

Young pines need special attention, and need to be guarded rigorously against animals and sun damage during their first few years. With good care while young, your pine trees will grow for decades. Pruning to direct growth is not necessary for pine trees and may stunt their growth. Cut dead or diseased branches a short distance from the trunk, leaving the “branch collar” ring between the branch and the trunk.
Moisture Requirements & Solutions:
Instead of following one watering guide without variation, you should pay attention to how moist the soil is around your tree. Here are some tips: Soil that feels moist and holds together when picked up should not be watered, as over watering can suffocate the roots. Only water when the soil is mostly dry and crumbles apart, until it feels moist again. Water more in fall so the tree is prepared for winter. Water additionally during dry winter spells to protect young trees from drought, which is especially dangerous when the tree expects a wet season.
Weeding Needs & Solutions:
Each pine tree should have plenty of open space, with no small plants around its base and no root systems of other trees nearby.
Feeding Needs/Optimal Natural Fertilizers:
Wood chips are cheap and work well for pine trees. Apply them to several inches (centimeters) depth around the tree, leaving space around the trunk. While mulch should help control weeds in addition to providing good growing conditions, you should pull out any grasses or other small plants near the base of the tree if you do see any grow there. Do not use a plastic barrier underneath the mulch. The tree needs water and air to be able to pass through the mulch. Fertilizer is not generally necessary for pine trees, and if used improperly can burn the plant. Only use fertilizer if advised by an experienced pine tree grower.
Pests, Diseases & Solutions:
A plywood sunscreen can also do double duty as an animal repellent. However, if you live in an area with deer or other persistent, large wildlife, you may need a plastic tube or chicken wire fence encircling the seedling. Pines can attract a number of insect pests, including weevils, boring insects like bark beetles, and sawyer beetles that spread the pine wood nematode. While these pests may or may not kill the tree, they can all do significant damage. Be proactive and try to protect your trees. You can also ward off pests by good management. Keep your trees healthy, for instance, as pests are less likely to attack healthy young saplings. Plant trees on medium soil to promote vigorous root growth and check your plantings often to prune dead or dying limbs. Planting some pine varieties (i.e. white) with hardwood trees or under a hardwood canopy seems to protect them from Dendroctonus bark beetles. It’s often best to remove damaged trees that will be vulnerable to pests. Always remove and destroy trees killed by boring insects, too.
Growing pine trees from seeds can be a long, challenging process. You will have to acquire seeds when the pine cones are ripe, most likely in autumn. Depending on species and climate, you may need to prepare the seeds for 30 to 60 days as describe below before planting in pots. They will grow slowly, and may take over a year before they can be transplanted into outdoor soil without significant risk of death. While most pine cones ripen between August and October, some species such as the Scotch pine remain usable until March. Your local climate will also be a factor. Read the description of ripe pine cones so you know what to look for. See Growing Pine Trees from Seedlings above for an easier, faster method. Pine cones come in two varieties: small male cones and large female cones. Only the female cones produce seeds. Choose large pine cones with scales that are not fully open, or spread apart. If the scales are spread apart, they may have already released their seeds. You may take fallen cones or pick them from the tree by twisting them off the branch. Female pine cones are usually higher on the tree, so you may need a stepladder or a hooked pole. Choose brown or purplish pine cones, as fully green cones are not mature and have not produced useful seeds. Pine trees that have produced many cones are more likely to produce useful seeds. Place them in direct sunlight if possible, and let them dry out so the scales open and give you access to the seeds. You may warm the room to speed this along, but do not heat the cones above 113ºF (45ºC). Each scale of the pine cone should have one or two seeds underneath it, sometimes attached to a thin “wing” for catching the wind. Shake the cones on a tray with 1/2 inch (1.25 cm) mesh or hardware cloth; the seeds should fall out of the cones and through the mesh. Shake over a tarpaulin to easily collect the seeds afterward. Use tweezers to pull out stubborn seeds, or if you only collected a few cones. Put the seeds in a clear, water filled container for 24 to 48 hours. Use room temperature water. Besides providing the seeds with water they need to begin growing, this provides a test of which seeds are usable. The full, viable seeds should slowly sink to the bottom of the container. The empty, unusable seeds will float to the top. Cut open one or two of the largest floating seeds to check whether they are actually empty. If they are full, wait longer for the remaining seeds to sink. Discard the floating seeds at the end of this process. They are not usable. Large operations sometimes place a bag of seeds in running water, which is better at removing fungal spores that could cause infection. This is difficult to achieve at home, but you could consider changing the water every 12 or 24 hours. Decide whether to store seeds before planting.
When to Harvest/Number of days to maturity:
Pine trees grow slowly and mostly take around 9 years. Give it good soil and enough water and fertilize it every 2 weeks or so. After the pine cones open, wild animals may take the nuts before you can harvest them. Plan on harvesting the tree when the pine cones have a greenish color with distinct scales that have not yet opened up. If some of the pine cones on the tree are open and some are closed, it’s ready to harvest. Plan on harvesting at least twice as many pine cones as you expect that you’ll need, as around half of the nuts in each pine cone will be empty.
How to Harvest:
Grab a pine cone in your hand and, with a twisting motion, pull it until it separates from the tree branch. Place the pine cone in a container and continue picking until you have enough for your needs. Each pine cone provides about 2 nuts per scale, with the total amount varying based on the pine cone’s size. Wear gardening gloves while picking up the pine cones to protect your hands from sap and scratches. Pine cones need about 3 weeks to dry before you can harvest the nuts inside. Place the cones in a burlap bag or similar container in the sun, lying the burlap sack sideways to help the sunlight dry them evenly. Do not stack the pine cones any higher than 2 cones deep while the bag is sideways. Any deeper and the pine cones may start molding. Tie the bag shut to prevent animals from eating your pine cone harvest.
Optimal Storage temperature and conditions:
Although drying the pine cones is traditional, you can also roast the pine cones in an oven. Spread the pine cones out on a pan and, setting the oven to 375°F (191 °C), let them bake until their scales open (which should take between 30-45 minutes). After heating the pine cones, remove them from the oven and let them cool before you shell the nuts. Pine cones emit a sap that, while harmless, is sticky and hard to wash off bare skin. A sturdy pair of gardening gloves will protect your hands while you work and keep them clean. Choose a pair of gloves that you don’t mind staining, as pine cone sap can permanently color cloth. If you get any sap on your hands, use an oil-based soap to wash it off. Pull off all of the pine cone scales to expose the nuts underneath. Pick each nut, which should look black and oval-shaped, with your fingers, then repeat the process with each additional pine cone. Place the pine nuts in a bowl and fill it to the top with water. Keep the nuts that sink to the bottom and throw away the nuts that float, as the floating nuts are most likely empty. You should expect about half of the nuts to float per pine cone. Holding a pine nut in your hand, place your nail inside the pine nut opening and make a divot. Then, pinch the sides with your fingers and roll it until the shell and outer skin rubs off. If you have short fingernails or can’t seem to open the pine nuts, you can also try pliers using a similar technique. After shelling the pine nuts, store them immediately to prevent them from spoiling. Because of their high oil content, pine nuts spoil when they’re left out for more than several hours. Unless you’re eating or cooking with your pine nuts right away, refrigerate or freeze them immediately after shelling them. Place your pine nuts in an airtight container and store them in the fridge if you plan to eat them within a few weeks. Pine nuts keep for about a month in the fridge before expiring, so plan to eat them within 30 days after shelling. Mark the container with the date you shelled the pine nuts so you know how long you have before they expire. If you want to keep pine nuts for long-term use, seal them in an airtight container and leave them in the fridge until you’re ready to use them. Write the date that you shelled the pine nuts on the container so you can use them before they expire. Pine nuts stay preserved for 3 to 6 months longer while they’re frozen.
Optimal Preserving Procedures:
Seed Saving:

Harvest and Storage

Notes

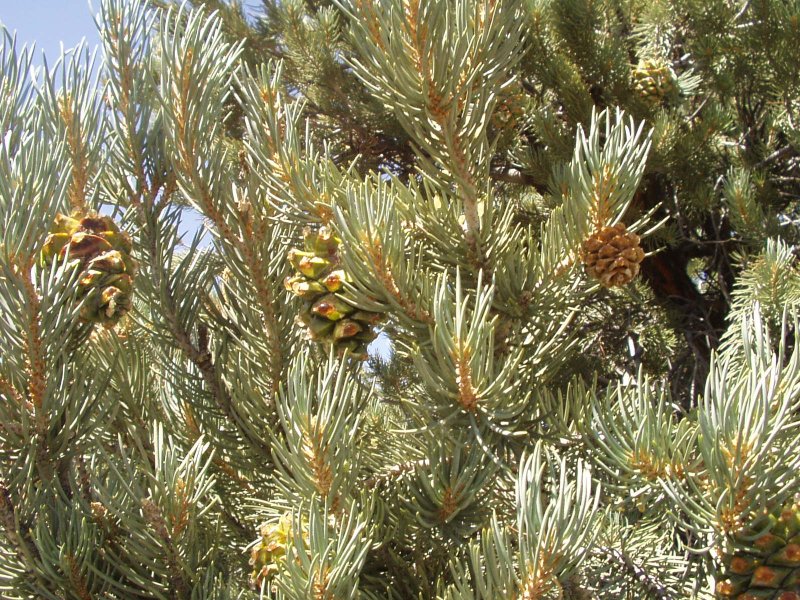
For the gray pine, you should collect the cones in September or October and keep them in an airy, but dry place, such as a garage. The cones should still be tightly closed at this point. Wait for the cones to slowly open, revealing their nuts. Then, bang the cones around in a gunnysack until all of the nuts fall out. Alternately, you pick them out by hand, if you don’t mind getting resinous pitch stuck to them. Toss out the winged part of the shell that connects the shell to the cone. Remove any nuts with holes in them; this means bugs have gotten to them. Do not microwave the pine cones, as microwaving will insufficiently dry the pine cones and ruin your microwave. If you don’t care about maintaining the integrity of the nut and are working with a tougher nut to crack, then you may just want to place the nuts on a solid surface and hit them with a hammer. Aim to do it a bit more softly so you crack the shells without pulverizing the nuts. Now, this is likely to make a big mess or put a dent in your floor, so try placing them on a piece of cardboard or in a thick plastic bag outside, so you don’t have any property damage as you try to break those stubborn nuts out of their shells. This method is not for the faint of heart and does require some power. Once you’re done, you can remove the nuts from the bag and peel off the extra shell. If you place the pine nut in the notched section of the can opener, right where the handles meet up, you can use the can opener as a kind of improvised nutcracker. This may do some damage to your can opener and it may take quite a while, as you’ll be shelling the nuts one nut at a time, but it will give you the results you’re looking for. Once you’ve cracked all of the shells of the nuts using a can opener, you can peel the remaining shells away with your hands. For softer pine nuts, you can simply place these nuts in a big plastic bag, push all the air out of it, place it on a flat surface, and then use a wooden roller to roll back and forth over the nuts. Continue doing this until you hear and see the shells of the nuts cracking, revealing the meat of the nut. This can take a little while, and you can roll the roller over smaller batches of nuts for best results. Once you’ve cracked all of the shells, simply remove the nuts from the plastic bags and peel off the remaining shells with your fingers. Though using your mouth to crack pine nuts isn’t the most recommended method, it will work in a pinch if you’re using soft-shelled seeds such as the gray pine nut. Simply do what you would do to crack a sunflower seed’s shell: place the nut in the back of your mouth and bite down on it a bit gently, until you hear the shell cracking. Then, remove the nut from your mouth and peel away the rest of the shell. Be careful not to bite down too hard if you want to keep your teeth healthy. This method is one of the best for preserving the original shape of the pine nut, if that’s important to you. Be careful, you might chip a tooth if you bite down too hard. Many people like to put pine nuts in the freezer to give them an extra crunchy taste and to make them last longer, while others maintain that this takes away some of their rich, nutty flavor. Once you see the hard work that goes into shelling pine nuts, you might be better able to appreciate the price tag that often comes with them. Some nuts just don’t crack right, just move to the next nut It takes practice to get good, be patient. Shelled pine nuts are available, but they have a much shorter shelf life than unshelled pine nuts. The taste of an unshelled pine nut is much richer than one which has been shelled. It is very cost effective to shell your own pine nuts and there are many ways to do it.

From the same Category

0 0 votes
Article Rating
Subscribe
Notify of
guest
0 Comments
Oldest
Newest Most Voted
Inline Feedbacks
View all comments

Contact to Listing Owner

Captcha Code
0
Would love your thoughts, please comment.x
()
x