Let´s create together.  
Edit Content
find a plant

Search by name or category

Lorem ipsum dolor sit amet, consectetur adipiscing elit. Ut elit tellus, luctus nec ullamcorper mattis, pulvinar dapibus leos.

Guava

Guava

This perennial is from the family of Mytraceae. It can grow to about 12 to 15 feet with
leaves that are dark green and shiny on top, but fuzzy and silver underneath. All guavas are
evergreen, shallow-rooted shrubs or trees The edible blooms are said to taste like minty guava and are
popular in salads and as a drink. Fruits are 2 to 3 inches long, oblong in shape (like an egg) and green.
The taste has been described as a combination of banana, pineapple, guava, and kiwi.

Introduction
Mr. John Doe

Head Director

Description

Optimal Time/Temperature for Germination:
The general Hardy zones are 8 to 10. Guava trees thrive in areas where the summers are warm, and the winters are cool. Normal outside temperatures should be between 59 °F (15 °C) and 82 °F (28 °C). You can ask your local nursery about whether or not your current location is good for growing. Temperatures below 59 °F (15 °C) can make your fruit’s quality inferior. The conditions of spring weather make it the perfect time to plant anything, including guava trees. During the spring, the soil will be easier to break and dig into, rain will help water the plants, and the sun will be out enough to give your tree the necessary light it needs. While the most common guava, the lemon guava isn’t well suited to withstand frosts as some guava varieties, like the pineapple guava of zone 7, the strawberry guava of zone 9, and the Chilean guava of zone 8.
Optimal Soil Conditions:
Make sure the spot receives at least 6 to 8 hours (half day) of sun daily. You’ll want to keep your tree out of the shade, so find a place where your house and other objects won’t cast a shadow throughout the day. Make sure the spot is in open space so the top of your tree doesn’t collide with anything. Guava works in a wide variety of soils so long as the soil has good internal and external drainage. This just means soil that allows water to pass through It easily. To check for this kind of soil, dig a 1 foot (0.30 m) hole and pour a little water into it. If the water disappears in only a few minutes, it’s good soil. If it continues to sit, then you’ll need to find another location. You should avoid shallow soil and compact, layered soil. This will make it difficult for your roots to stretch. If your soil is hard and compact, you can add compost to help it reach the correct conditions. Dig down 2 feet (0.61 m) deep and work the composite into the soil. A pH of 4.5 to 7.5 appears to be soil workable. They can tolerate salty soil and air, which makes them great choices for coastal areas. One thing they do not tolerate is soggy soil.
Seed Planting Depth, Spacing and Procedure:
The process of growing from either is roughly the same. However, while it’s more common to plant guava trees by seed, cuttings are actually more optimal. Cuttings yield more fruit and fruit of better quality when compared to seeds, but seeds are cheaper. Remove rocks or other debris you come across while digging. Once you have your hole, loosen the soil a bit at the bottom with the tool you used to dig it. If using a pot, make sure it too is at least 2 feet (0.61 m) feet deep. Fill the hole to about the length of your index finger to create a mound. For seeds, place them on top of this mound. For cuttings, hold it by the graft line or crown (the part of the plant where the stem meets the roots) and place it on top of the dirt, making sure that the graft line is above ground level. Then spread the roots across the hole. As the added dirt mound is created from already broken soil, it allows new roots to have an easier time penetrating the ground. If you’re planting multiple trees, plant them 10 feet (3.0 m) to 12 feet (3.7 m) apart, so they don’t cannibalize each other’s water source. Don’t compact the soil after you fill the hole, keep it loose. You want to make sure that your tree has room to spread its roots and grow with little resistance. For cuttings, take care that no roots are above the soil and that the graft line is. Cut off any roots above the graft line if necessary. Get low to the ground to make sure your cuttings are completely vertical once planted. Mark where you’ve placed seeds with little flags that can be easily removed once the seed has sprouted. Many varieties are considered self-fertile, however planting a second tree as a cross-pollinator will increase the fruit production of both trees. To guarantee a rich yield, hand-pollinating can be done between the two trees.
Best Companion Plants and Plants that Hinder:
Some of the best Companion Plants include: citrus trees, chives, marigold, comfrey, and borage. Some of the worst companion plants are cucumber, eggplant, and potato.

Growing Instructions

Crop Maintenance

You’ll want to start pruning around 3 to 4 months after the tree has sprouted. If your tree has multiple trunks, find the middlemost one and cut the others away at their base. Trim up the side branches to keep them around 2 feet (0.61 m) to 3 feet (0.91 m) in length. Cut any branches that sprout from other branches and any dead or damaged branches you find as well. Exposure to extreme cold can severely damage or kill a guava tree. You can use tarps or blankets to protect the top of the tree. You don’t need to drape the entire tree, just the top. Anchor the corners of whatever you used to cover the tree to the ground. In addition to this, you can place another heat source below the tree to give it practically complete freeze protection.
Moisture Requirements & Solutions:
While the tree is young, you should water it 2 to 3 times a week. Once it matures, however, it won’t need as much water so 2 to 3 times a month should suffice. Guava trees are sensitive to waterlogging, so be sure to regulate what you give. Guava trees are mainly rain-fed.Remove any weeds and grass from the tree’s area as a young guava tree cannot compete very well against them for water and nutrients.
Weeding Needs & Solutions:
Maintain a grass and weed free area 2 to 5 or more feet away from the trunk. Never hit the tree trunk with lawn mowing equipment and never use a weed- eater near the trunk.
Feeding Needs/Optimal Natural Fertilizers:
Your tree should be well established before performing this step. Scatter the fertilizer around the tree while making sure not to come in contact with the stem. Once you’ve done that, water the tree and fertilizer thoroughly. It’s preferred that you wait a year before fertilizing your tree. When potted, these trees do best when fertilized twice a year. Adding a fresh layer of compost annually will also help provide needed nutrients.
Pests, Diseases & Solutions:
One of the most common pests that attack guava fruits are fruit flies. These insects lay eggs inside the guava, and these eggs hatch into maggots that eat the flesh of the fruit. There are a couple of ways to combat fruit fly infestations. One method is to pick the fruit before it ripens fully. Fruit flies only infest fruit that is already ripe and beginning to soften. You can also create a trap with vinegar and liquid dish soap. Guava wilt disease symptoms include wilting and yellowing or bronzing of the leaves, noticeable sagging, and the premature shedding of fruits. There is no cure for this, but heavy doses of nitrogen after fruiting and protecting the roots from damage can stave it off. Stylar End Rot only affects the fruit of the tree, discoloring it to brown or black. Infected fruit cannot be saved, but a natural fungicidal spray can save the rest of your crop. Anthracnose causes young shoots to die rapidly while leaving the fruit and leaves attached. It also causes fruit and leaves to develop dark lesions. Like Stylar End Rot, this is a fungal infection and fruits not affected can be saved with a natural fungicidal spray.
When to Harvest/Number of days to maturity:
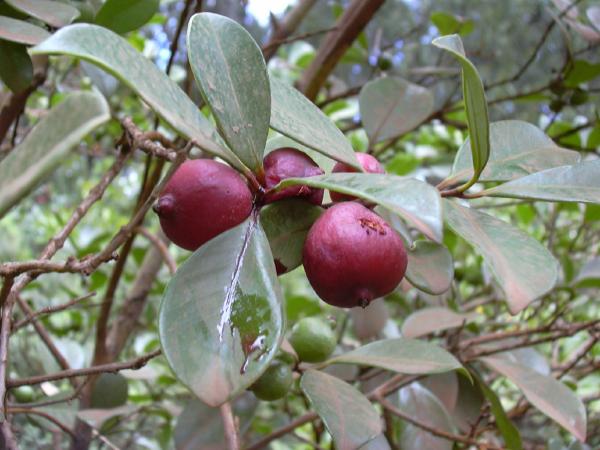
You’ll know when your fruit is ripe and mature enough to pick by the change of both its color and texture. Color will change from green to yellow, and then the fruit will soften. These trees bear fruit after two or three years from planting, ripening in August or September.
How to Harvest:
When picking guavas, look for fruit with a rough, green skin. These guavas aren’t yet ripe, which will give you more time to enjoy them. Other gardeners will allow the fruits will fall off the tree to collect them from the ground.
Optimal Storage temperature and conditions:
It’s a tropical fruit that tends to go bad quickly after ripening. To prolong the life of your guava, you can refrigerate. P lace the entire fruit in a bag to protect it in the refrigerator. Other fruits can give off gasses that encourage ripening, and the bag will ensure that the guava is safe. Make sure the bag is clean and dry before putting the guava in it. Dirt and water can cause the guava to ripen further in the refrigerator. Remember to label the bag with the date for future reference. Be sure to set the crisper drawer to a medium humidity to ensure that the guava doesn’t become too dry or too moist. Leave the bag open slightly at the top to let air circulate through the bag and the drawer. After 4 days in the refrigerator, the guava will be past ripe and should be thrown away. Over-ripe guava will dent when you press on it. Your guavas should be soft to the touch and have a strong, heady scent before you refrigerate them. If the guavas aren’t ripe yet, let them sit on the counter for 2-3 days until the skin yields when you press on the fruit. Avoid placing guava near a window because the heat and light can make it ripen too quickly. If the guava is taking a long time to ripen, try placing it in a paper bag with the top slightly open. To freeze it once it’s ripe, Rinse the guava under cool water and blot the fruit dry with a paper towel. Then, use a knife or peeler to carefully remove all of the skin from each guava. You can dispose of the skin, or you can place it in a compost pile with other food scraps. Be careful when using the peeler on the guava. The small, rounded shape can cause the peeler to slip. On a cutting board, slice the guava in half through the widest part in the middle of the fruit. You can cut the halves again to make chunks, or leave them in halves to freeze. This will help the sugar in the simple syrup to permeate into the fruit and keep it tasting sweet after the freezing process. Once the guava is cut, get a freezer bag or airtight container with a lid. Make sure it’s large enough to fit all of the fruit with about 0.5 to 1 inch (1.3 to 2.5 cm) of empty space at the top of the container, called headspace. The head space will allow for quicker freezing time, which keeps the guava fresh for a longer period in the freezer. Simple syrup is a mixture of equal parts water and sweetening choice that is heated to a boil to create a sweet syrup. Pour the cooled syrup into the container or bag until the guavas are completely submerged, but remember to leave enough headspace in the container. If you’ve just made the simple syrup, let it cool before pouring it over the fruit. Warm syrup can cook the guava, causing a change in taste. Make sure the lid of the container is closed tightly or the bag is completely sealed. Label the container or bag with the date and let it sit in the freezer undisturbed for at least 12 hours before thawing. If you’re going to freeze the guavas for a long period of time, avoid placing them in the door of the freezer. The door experiences more temperature changes than the rest of the freezer, which can cause thawing. While guava can last in the freezer for long periods of time, the taste of the fruit will deteriorate after a year. When you’re ready to use it, place the guava in the refrigerator for 2-3 hours to thaw before taking it out of the container. If you’re not sure how to use your frozen guava, you can try making juice, baking guava-based pastries, or even whipping up a guava barbecue sauce. Other options are to make jellies, jams, pies, and juice.
Optimal Preserving Procedures:
Seed Saving:
Propagation can be done through cuttings, and it is best to do this in the fall. To propagate, you will need a sharp pair of garden snips, light soil, a small pot, and rooting hormone. Then follow these instructions: a) Using the snips, cut a small softwood cutting from the bottom of the shrub. A cutting around 10-12 inches is ideal. Be sure the cutting has some healthy leaves and a few nodes on it. b) Remove any leaves on the lower section of the cutting. c)Dip the cut end into a rooting hormone. Shake away the excess powder. d)Gently plant the cutting into a light soil mix, such as those used for seed starting. A mix of peat, sand, or sawdust is also a good choice. Keep the cutting moist and in bright sunlight. e) Roots should form in about two months and can be transplanted to the garden at this point.

Harvest and Storage

Notes

From the same Category

0 0 votes
Article Rating
Subscribe
Notify of
guest
0 Comments
Oldest
Newest Most Voted
Inline Feedbacks
View all comments

Contact to Listing Owner

Captcha Code
0
Would love your thoughts, please comment.x
()
x