Let´s create together.  
Edit Content
find a plant

Search by name or category

Lorem ipsum dolor sit amet, consectetur adipiscing elit. Ut elit tellus, luctus nec ullamcorper mattis, pulvinar dapibus leos.

Aloe Vera

Aloe Vera

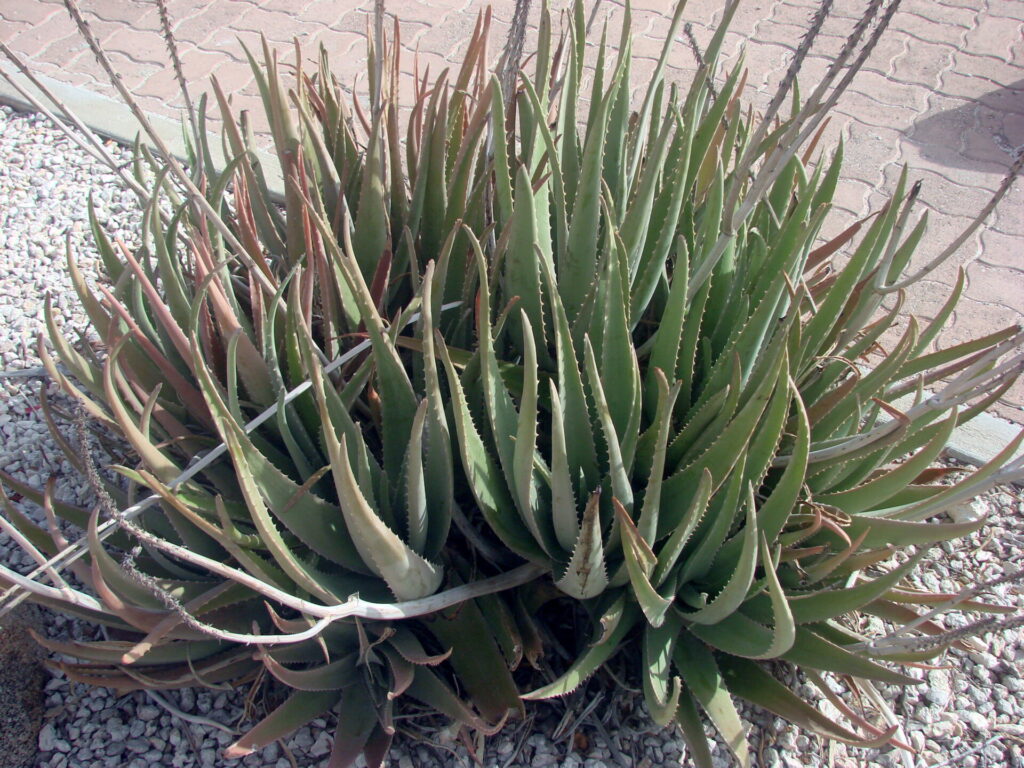
is a species of succulent plant that thrives in dry, hot regions of the world. Aloe vera is a stemless or very hort-stemmed succulent plant that can grow as high as three feet tall. The leaves are thick and fleshy, reen to grey-green, with some varieties showing white flecks on the upper and lower stem surfaces. Yellow flowers may grow on outdoor aloe plants, but not on indoor potted aloe plants. Aloe plants are made up of 95 percent water, and even a slight frost will freeze them and turn them to mush.

Aloe barbadensis is the type of aloe generally used medicinally. There are over 450 species of Aloe, some of which appear to have similar properties but possibly less effective. Other aloes are poisonous. There are bitter aloes (like Aloe ferox) and very pointy aloes (Aloe acutissima). Aloe Vera is a hermaphrodite plant so it doesn’t require a male or female plant for its reproduction process. Both these organs are present in the plant.

Propagating new plants:

The young plants will do best if you wait until they are a little larger and mature enough to have a few roots of their own. While this size varies with subspecies and individual plants, a good rule of thumb is that the young plant should be at least 3 inches (7.5 cm) tall, and preferably 5 inches (12.5 cm). If the container has sufficient space, wait until the young plant is 1/5 the size of the adult and has several sets of “true leaves” that look like the adult’s. Sanitize your knife first to reduce the chance of infection. Clear away the dirt at the base of the pup to see whether it is attached to the mother plant. If it is, cut it away, making sure to keep the young plant attached to its roots if any are present. The presence of its own roots will increase the odds of success, but they may not be easy to find before you remove the pup.

Instead of planting the new aloe immediately, you may wish to allow the plant to form a callus over the knife cut. Placing the cut surface of the plant directly against soil increases the odds of infection. Place the young plant on top of well-draining soil, without burying the leaves.

Because the root system is likely to be small (or even nonexistent), you may need to prop up the plant with a layer of pebbles and lean it against another object. The root system should grow large enough to support the plant within a few weeks.

Mist once every few days if the plant has no roots. Before the roots have grown in, do not water the plant. Wait at least a couple weeks for a pup to grow its own roots before watering it.

Instead, mist the plant with a spray bottle once every three days. Aloe plants can last a long time without water, and if you water the plant before its roots are extensive enough, the water could pool and rot the plant If the pup already has its own root system, you may instead get the roots to set by giving it one watering and leaving it in the shade for 2 to 3 weeks.

Introduction
Mr. John Doe

Head Director

Description

Optimal Time/Temperature for Germination:
Aloe Vera plants are native to tropical regions, but they’re common household plants in a variety of cli-mates. Aloe Vera plants prefer 8–10 hours of sunlight a day. While they grow best in warm or hot tempera-tures, they are capable of surviving cooler seasons in a more dormant state. However, they may suffer harm if exposed to temperatures below 25ºF (-4ºC). Hardiness zones 9, 10, and 11 are most suitable for keeping Aloe vera outdoors year round. If you live in another zone, you may wish to keep your Aloe vera outdoors most of the year, and bring it indoors before the frost. The sunniest windows are those facing west or south if you live in the northern hemisphere, or those facing west or north if you live in the south-ern hemisphere. While aloe is hardier than most plants when it comes to sun exposure, it is still possible to burn the leaves. If the aloe plant turns brown, move it to an area that receives shade during the early af-ternoon. If the leaves are growing flat and low, increase sunlight. Aloe Vera leaves should grow upward or outward at an angle, toward the sunlight. If they are low to the ground or growing flat outward, the plant is probably not receiving enough sun. Move it to a sunnier area. If it is indoors, consider keeping it outdoors during daylight hours. If you live in growing zones 10 to 11, where there is no chance of freezing, you can grow your aloe outdoors as a garden plant instead of as an indoor house plant.
Optimal Soil Conditions:
If planting Aloe Vera in a container, make sure the container has a hole in the base for water to drain through. Aloe Vera plants are adapted for survival in dry conditions, and may rot if planted in soil that collects standing water. Use a cactus potting mix, or create your own mix using equal parts soil, sand, and gravel. Place the Aloe Vera root ball just below the soil surface. If any of the thick, green leaves are partially buried or touch the soil, they may rot. Place a layer of small rocks around the base of the aloe plant to keep the soil in place and reduce evaporation. This is not required for your aloe plant to thrive, so you may leave the soil exposed if you prefer the appearance. White stones will reflect warmth from the sun to the base of the plant, which can be a good idea if you do not live in a hot climate. While any healthy aloe plant has a chance to produce younger plants, or “pups”, this is most likely to happen when the adult plant has reached the boundaries of its container. Aloe prefers neu-tral to slightly alkaline soil in the 7.0-8.5 pH range. If the soil is too acidic, this will hinder the growth of new roots. Best Companion Plants: borage, scented geraniums, any plant from the onion family, sow thistle, balm of Gilead, elderberry, Aeoniums, Agaves, and Sedum nussbaumerianum (Coppertone stonecrop) are compati-ble companions.
Seed Planting Depth, Spacing and Procedure:
***
Best Companion Plants and Plants that Hinder:
***

Growing Instructions

Crop Maintenance

Moisture Requirements & Solutions:
Aloe Vera plant can withstand hot climates since the plant stores water in its stems. It could live up to 2-3 month without watering. Before you start watering, give the aloe plant a few days to repair any roots that may have been damaged during planting. Watering damaged roots increases the chance of root rot. Give it a light watering the first one or two times you water if you would like to be extra safe. During summer, or any time the weather is warm and sunny, aloe plants will grow fastest with regular watering. However, it is much easier to overwater aloe plants than to dry them out, so do not water until the soil has dried out to a depth of 3 inches (7.5 cm). If the leaves are thin and curled, increase water. The thick, fleshy leaves store water that the plant uses in times of drought. If the leaves are looking thin or curling, water the aloe plant more frequently. Be careful not to overcompensate: water should drain quickly through the soil to prevent root rot, which is difficult to stop. Yellowed or “melting” leaves are suffering due to excess water. Stop watering altogether for the next week (or two weeks during the dormant season), and water less frequently once you resume. You may re-move any discolored leaves from the plant without much chance of harm, although it is best to use a disin-fected knife. Aloe plants often go dormant during winter, or when the weather is cold for a prolonged period of time. Unless you are keeping them in a heated room year round, you should only water them once or twice a month during this period.
Weeding Needs & Solutions:
The soil around the aloe plant should be free of grass and weeds. Remove these regularly if the plant is out-doors, but do so carefully. Because good aloe soil is loose and sandy, it is easy to damage the roots with vig-orous weed- pulling.
Feeding Needs/Optimal Natural Fertilizers:
Aloe plants do not require fertilizer, and overuse can harm the plant or cause it to grow in an unhealthy manner.
Pests, Diseases & Solutions:
There are a few pests that are common fans of the aloe plant, such as mealy bugs. These bugs are flat and brown or tan and they like to suck on the sap from aloe plants. To prevent them, use a natural pesticide on your aloe plant. The difference between aloe root rot (brown or black, mushy and may fall off if touched, or rotten smell) and healthy roots (white or pale. Firm and strong, no smell) will be evident. Before you treat root rot, make sure to trim off infected roots and don’t forget to gently wash the soil off the remaining healthy roots before re-potting it with fresh soil. You can use a natural fungicide, hydrogen peroxide, or homemade remedies like cinnamon, charcoal, and chamomile.
When to Harvest/Number of days to maturity:
Unlike many plants in the succulent family, Aloe Vera cannot be grown from a leaf cutting. You must instead use the younger, separate plant attached to the main plant, preferably with its own roots system and several shoots. Wait until you need the gel to harvest it. When you need it cut a leaf one at a time.
How to Harvest:
If you’re going to remove leaves from your aloe plant, take the lower, older leaves from the bottom of the plant.
Optimal Storage temperature and conditions:
You can place a broken-off leaf in the refrigerator to cool it down, then rub it over a burning for healing, skin dryness, create a facial mask, sooth a cold sore, make homemade soap, or add to a smoothie. Aloe plants can be very handy to have around. Break off a mature aloe leaf and rub the gel from the inside over your sunburn or cut open the leaf and place it gel side down on your burn and reapply every few hours or as needed to keep your skin moisturized. The area where you broke the leaf will callous over and the plant will be just fine. Don’t use aloe on open skin or wounds that are below the surface of your skin. If you have a major burn, see a doctor. Do not apply aloe gel to skin that is bleeding, blistered, or otherwise severe-ly damaged. Wait until you need the gel to harvest it. If you are harvesting a large amount, you may need to cut the leaf in half (lengthwise) in order to get all of the gel out. If you have any leftover gel, you can store it in an airtight container in the refrigerator for up to a week. There are three main methods used to increase the shelf life of your freshly harvested gel – freezing the gel, mixing the gel with honey, and mixing the gel with vitamin C: a freeze the gel in an ice cube tray rather than one large block means that you can just take out individual pieces whenever you need them. Using a silicone tray works best as you can turn the tray inside out. Small plastic containers also work fine if you do not have an ice cube tray. Once your tray is filled, the gel is ready to be frozen. Make sure the tray is flat in the freezer to avoid any of the gel seeping out. Leaving the cubes overnight will give them plenty of time to freeze. The cubes need to be totally frozen to be preserved so make sure you give them enough time in the freezer before removing. Store the cubes of aloe vera gel in your freezer for up to a year. Keeping them in a bag will enable you to have easy access when you decide to use them. b the container needs to be large enough to mix the honey in but feel free to use smaller containers if it is more convenient for your storage set up. The container should also have a lid to keep contaminants out. Mix honey in with the gel at a 1:1 ratio. Honey has such a low water content versus a high natural sugar content that it helps preserve the gel for a much longer time than the gel would have naturally. This process is similar to the way fruit is often stored in syrup or as a preserve. Using a high-quality honey that is free from pre-servatives will ensure that the gel lasts as long as possible. Store the gel in the fridge or at room temperature for up to 8 months. Be sure to keep the gel away from direct sunlight. Because the aloe vera is now in a gel solution with the honey, it mixes really well into other products. These options might include: Facial scrubs, Body wash, and Hair products. c put your aloe vera gel into a blender but don’t blend yet. The gel has a very gelatinous texture in its raw state and this can make it difficult to work with when using the gel for some purposes. Putting the gel through the blender allows it to become separated and liquefied. This makes it much easier to work with. Add your crushed vitamin C tablet. For every ¼ cup (60ml) of gel, add in 500 milligrams (0.018 oz) of vitamin C to the mixture. This combination will help preserve the gel for up to 8 months in the refrigerator once it has been mixed in. Blend your gel on high for a few seconds. This will ensure that the vitamin C is mixed in with the aloe vera and that the texture becomes liquefied and broken down. You should be left with an aloe vera juice. The juice should be much more runny and less gelatinous than it was before. Transfer the juice to a covered plastic container. There will be a foamy layer on the top of the liquid but this will go away after a few days so there’s no need to wor-ry about it. Move your juice to the refrigerator for storage. The juice is now ready to be used or stored for up to a month.
Optimal Preserving Procedures:
***
Seed Saving:
If you are lucky enough to see your aloe flower and fruit, you may collect the seeds and attempt to plant them. Because a bird or insect may have cross-pollinated the Aloe vera with a different aloe species to pro-duce a plant with different qualities, and because growing from seeds has a lower success rate than growing from pups, this is rarely done. If you do attempt to grow aloe from seeds, use black seeds and spread them across the surface of the soil. Weigh them down with sand and water frequently until they sprout. Grow them in indirect light and transplant them to a larger pot 3 to 6 months after sprouting.

Harvest and Storage

Notes

Any plant kept in the shade for a long period of time may require slow adjustments before being ex-posed to full sun. Move it to an area of partial shade for several weeks before placing it in sunlight. To help your aloe last for years, it’s a good idea to repot it in in a bigger pot where it will have more room. If the aloe is already in a large, sturdy clay pot with holes in the bottom, you don’t necessarily need to repot it. Do not use aloe if you have a known allergy to plants in the Liliaceae (lily) family. If you have cats make sure you don’t let them nibble your aloe vera plant! Aloe vera gel has been found likely to be effective for treating dandruff. All you have to do is massage a small amount of the gel into your scalp. After you have washed your hair, rub a small amount of aloe gel between your hands (about the same amount you would use to shampoo your hair). Then use your fingertips to massage the gel into your scalp and leave the gel in your hair. Warning: If you are harvesting the aloe vera gel straight from the plant you will need to make sure you let the plant sit vertically in some water after slicing a small portion off the end to allow the aloin to drain out. Aloin is a highly potent laxative and if it isn’t removed it can have some unwanted effects on those who consume aloe vera products. You might want to reconsider eating the raw whole leaf– even a tiny bit. According to the US National Center for Complementary and Integrative Health, oral aloe is associated with a risk of diarrhea and ab-dominal cramping. Also– potentially more dangerous is that raw aloe leaf extract has been shown to increase digestive system tumors in lab animals. While it has not been proven to be dangerous in hu-mans, there is a definite risk from eating the raw leaf.

From the same Category

0 0 votes
Article Rating
Subscribe
Notify of
guest
0 Comments
Oldest
Newest Most Voted
Inline Feedbacks
View all comments

Contact to Listing Owner

Captcha Code
0
Would love your thoughts, please comment.x
()
x